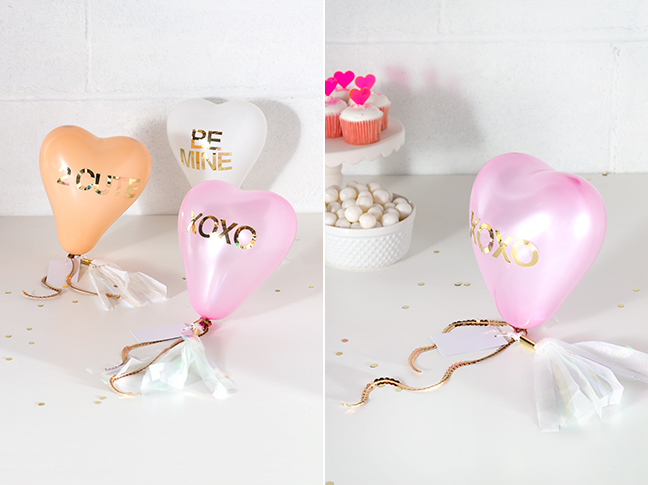

If you’re looking for a fun alternative to the classroom valentine (or office valentine, provided you use HR-approved verbiage!), I’ve got just the DIY for you! Inspired by everyone’s favorite chalky seasonal candy, these conversation heart balloons valentines are a modern, sparkly interpretation of the classic conversation heart. Add a fun little tassel and an optional gift tag, and you’ve got a sweet little surprise that everyone will love.

A helium tank is optional for these guys since they don’t hold enough air to even really let themselves take off, but I highly recommend filling them this way. Although the hearts won’t float, they will stand upright as shown, which makes for a nicer presentation when you leave them at someone’s desk! It takes such a small amount of helium to inflate these guys that even if you had them blown up at the local party store, you won’t be set back very much at all.
Supplies
- 6″ mini heart balloons (ours are available at BalloonsFast)
- 1″ gold vinyl letter stickers (ours are available here at Amazon)
- white cotton string
- scissors
- sequin trim
- tissue paper
- mylar (we used opalescent, available at Michael’s)
- metallic tape (ours is from 3M, available at Target in the scrapbooking section)
- helium tank (optional)
Instructions:
Step 1: Inflate the mini heart balloons with air or helium. Using the gold vinyl stickers, write out simple conversation heart phrases including: BE MINE, XOXO, UR CUTE, MY LOVE, KISS ME, CUTIE PIE, TRUE LOVE, and any other short phrases you’d like to add. To ensure your phrases are centered on the balloon, start applying letters at the center of the word, working outward. For example, if you are writing BE MINE, add the B slightly to the left of the center and the E slightly to the right, so the space between falls at the center of the balloon; then do the same for MINE. If your word seems a little too weighted on one side, never fear! The vinyl letters pull off without too much hassle, making fine tuning fairly easy.

Step 2: Cut mylar and tissue paper into ½” wide strips. They can be as long as you’d like, but double your desired length as they will be folded over. For example, I wanted a 6″ tail to mirror the size of the balloon, so I cut them 12″ long. Set them aside.
Step 3: Compile the strips of mylar and tissue paper, layering in a neat stack that is squared up to each other on all sides. You can assemble them in whatever order you’d like, although I found alternating between mylar and tissue provided a nice balance of shimmer and matte. Thread a length of cotton string across the vertical middle of the strip stack, and then double the stack over the string as shown.

Step 4: Twist the strips on themselves to gather the tassel until you have about ¾” to 1″ of twisted area. Cut a small bit of metallic tape and wrap it around the twisted section for a sparkly way to secure the tassel.
Step 5: Use the white cotton string that is now threaded through the tassel to secure it to the conversation heart balloon. Double or triple knot the string around the balloon knot to ensure it is secured. If you want to add on a gift tag, thread it onto the cotton string and knot two or three times again, and then cut away any excess.
Step 6: Cut a length of sequin trim that is just slightly longer than your strip length.Tightly tie the trim in a knot around the balloon knot, covering the white cotton string from the tassel.
Step 7: Pick the completed balloon up and neaten it up. Cut the tassel strips and the sequin trim so it is all flush to each other. Fluff the tassel for presentation, and then hand out to a grateful recipient!
Photos by Maddy Hague of Splendid Supply Co. for Momtastic.
More Valentine’s Day DIY Crafts: