Christmas has come and gone, and even though you’ve packed away your wreath for the season, your doors don’t have to go bare for the rest of the winter season.
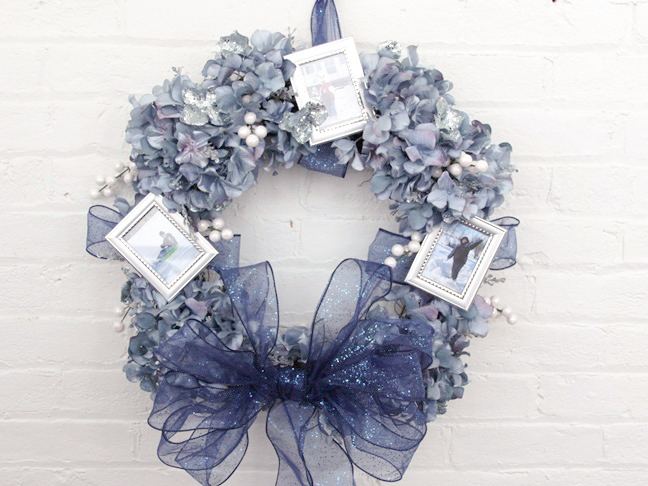
DIY Winter Picture Memory wreaths are a unique way to display your newly minted winter family photos. These also make a great gift with a personal touch for the person who has everything. You can change up the colors and make this photo wreath idea for any season or occasion.
Materials:
- 18 inch grapevine wreath
- 30 foot by 2 1/2 inch blue wired ribbon
- 7 to 9 blue floral hydrangeas
- 1 white holly berry spray
- 1 silver floral spray
- 3 ~ 2 1/2 inch by 3 1/2 inch photo frames
- 1 paper towel tube
- glue gun
- hot glue

Instructions:
Step 1: Make a bow for your wreath by wrapping 5 or 6 loops of ribbon, 10 to 12 inches wide. Hold the loops securely in the center.

Step 2: Wrap a second 24 to 28 inch piece of ribbon around the center and fasten it in place with a little bit of glue to gather and hold the center of the bow together. Leave about a 10 inch tail on each end. Cut the tips of the tails at an angle.

Step 3: Use your fingers to separate the loops on each end of the bow to form the loops. Keep working the loops until they’re all separated and look full.
Step 4: Use the hot glue gun to glue the bow to the bottom front center of the grapevine wreath.

Step 5: Cut, then loop, another 14 inch piece of ribbon around the top of the wreath and tie it securely to hang it on the wall.

Step 6: Size to fit and insert 3 of your favorite winter scene photos into the photo frames.
Step 7: Use scissors to cut 3 ~ 1 inch wide sections from the paper towel tube.
Step 8: Use the hot glue gun to glue 1 piece of paper towel tube to the center back of each frame. Be careful you don’t glue over the opening so you can change the photos later if you need to.

Step 9: Glue one photo frame to the top center of the wreath over the top of the ribbon. The frame doesn’t have to be straight up and down; you can tilt it slightly to the left or right.
Step 10: Remove the hydrangea blooms from their stems. They should have a joint right behind the flower to separate them from the stem. If they don’t, separate them with a pair of wire cutters.
Step 11: Hot glue 2 blue hydrangeas to each side of the photo frame at the top of the wreath.

Step 12: Add another photo frame to each side of the wreath below the hydrangea blooms using the hot glue to secure them in place. Each frame can be tilted slightly to the left or right.
Step 13: Add 1 or 2 more hydrangea blooms between the frames and the bow at the bottom on each side of the wreath.

Step 14: Cut the individual flowers off of one of the hydrangea blooms you have left over and use them to fill in around the bow and the frames.

Step 15: Add in sprigs of white holly berry and silver foliage to help fill in between the hydrangea blooms.


Step 16: Add a 3 to 4 inch loop of blue ribbon to the sides of each of the photo frames on the side of the wreath, and one loop below the photo frame on top. Secure them in place with hot glue.

Step 17: Hang your wreath on a wall or door or give it as a special gift.